By Wendi Gratz
Embroidery is a really terrific craft. The tools are inexpensive and readily available, the projects are portable, and you can embroider ANY drawing. Today I want to introduce you to the basic tools, teach you how to transfer an embroidery pattern, and give you specific details on how I stitched up one of Joel’s designs.

The Tools
You don’t need much to start stitching. $10 and a trip to a fabric or craft store will get you everything you need.
– A couple of embroidery hoops in different sizes. I use my 7” hoop most often.
– A packet of embroidery needles in various sizes. You can use any sharp needle, but those specifically labeled “embroidery” have bigger eyes to accommodate the thicker thread.
– Embroidery thread. I use DMC brand. They have a great range of colors and the quality is very good. Embroidery thread comes 6-strands thick. You peel off as many strands as you like to adjust the thickness of your thread.
– Your favorite tools for transferring the pattern. This can be as basic as a sharp pencil, or as fancy as transfer paper and pens with iron-on ink.
– Fabric to stitch on.
Transferring the Pattern
I used three of the buildings from Joel’s Paper City designs and transferred the pattern to plain white muslin the most basic way possible – with a pencil.
1. Download the page and print it out.
2. Tape the pattern to a window. Or use a lightbox if you’re fancy-schmancy.
3. Tape the fabric over the pattern. Make it taut – but don’t stretch it so tight that it distorts the shape of the fabric. You want the straight lines of the buildings to stay straight – not spring into curves when you untape the fabric. :-
4. Trace the entire design with a sharp pencil.
5. Done!
Transferring with a pencil is a great way to start because it’s simple and you don’t need any special tools – but it can be annoying because the pencil tends to drag the fabric around a bit. If you’re having trouble with this, iron a piece of freezer paper to the back of your fabric piece. It will stabilize it enough for you to be able to draw on it without irritation, and you can peel it right off when you’re done. You can find freezer paper in any grocery store near the aluminum foil.
If you want to transfer the image onto dark fabric, or napped fabric (like velvet or corduroy), or want to repeat the pattern multiple times, see my tutorial about other transfer methods at here. If you want to stitch on a T-shirt, see this tutorial for some specific tips on working with stretchy fabrics.
Time to Stitch
The fun thing about embroidery is that YOU get to decide what colors you use, what stitches you use, how thick your lines are, etc. But a lot of people always want to know how to duplicate exactly what I have on the cover of my patterns, so I thought I’d provide a stitching guide to MY version of Joel’s Paper City, as well as give you some insight into why I made the decisions I did.
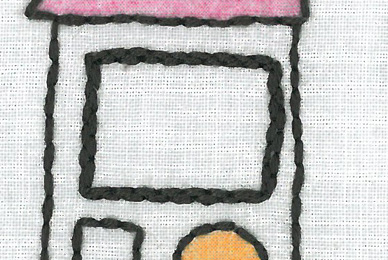
I love the black and white line drawings that Joel does, and I didn’t want to mess with that quality too much – so I kept most of my lines nearly black (I use DMC #3371 for almost all outlining. It’s a very, very dark brown that looks black at a glance, but it’s not quite as harsh-looking as black can be on fabric.)
I loved the squiggly, doodly lines across the two taller buildings, so I decided to highlight those with colored thread. I also stitched all the plants in green thread to make them look like living things on the cartoony buildings. I added other pops of color by shading some of the windows with colored pencils before I started stitching. I use Prismacolor colored pencils – the pigment is really rich and they work beautifully on fabric, but you can use anything – even regular old crayons.

So here’s what I did. Step 1 was to transfer the pattern. Step 2 was to color in all the windows I wanted to. Step 3 was to stitch. I used just four stitches on this project – below are links taking you to video tutorials where you can learn how to do them.
Backstitch
Split stitch
French knot
Lazy daisy
These are the four most basic embroidery stitches there are. With just these stitches you can stitch any pattern you find out there. Really.
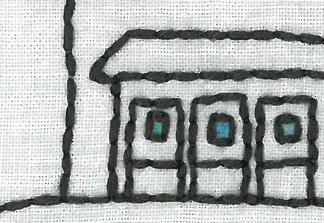
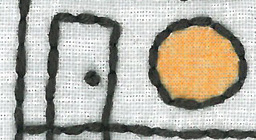
All of the main building lines and the road are backstitched with 4 strands of DMC #3371.
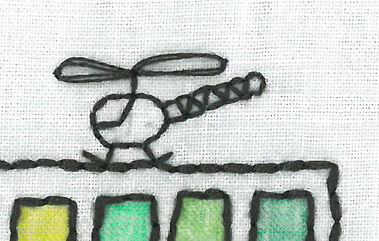
The patio furniture, pot and helicopter on the roofs are backstitched with 2 strands of DMC #3371.
The leaves of the plant on the roof are stitched with 2 strands of DMC #704 using the lazy daisy stitch.
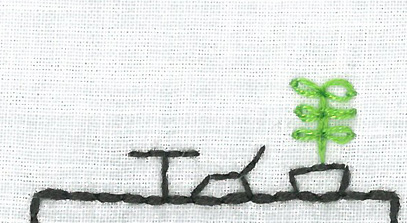
The tree in front of the first building and the stem of the plant on the roof are split stitched with 2 strands of DMC #704.
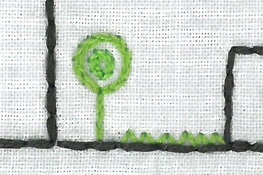
The grass is just little straight stitches in 2 strands of DMC #704.
The helicopter blades are 2 strands on DMC #3371 in lazy daisy stitches.
The door knobs are French knots with 4 strands of DMC #3371.
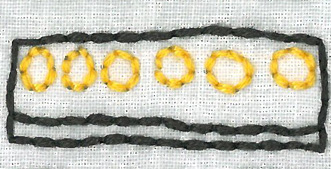
The yellow circles and the squiggly, doodly lines are backstitched with four strands of thread. The yellow circles are DMC #743.
For the thick window frame in the center building, I used the same 4 strands I used on the rest of the building – I just stitched around it twice.
That’s it! Happy stitching!
Wendi Gratz lives online at Shiny Happy World (http://www.shinyhappyworld.com) where she offers free sewing and embroidery video tutorials and patterns designed especially for beginners of all ages.
Just to let you know that here in the uk we can’t get freezer paper in grocery stores. Some agreement between two major companies (one in uk, one in us) about not trading on each other’s turf. There is a special cause that allows it to be sold for doll making and patchwork etc, so uk readers should google freezer paper and patchwork supplies. Sadly it’s heavy to post so it becomes a precious resource, not an everyday product
if you really can’t find freezer paper, you can try making your own. http://www.instructables.com/id/Make-your-own-freezer-paper./
Thanks for letting me know that about the freezer paper. I think of it as such a standard thing! I’ll definitely go back and add the link for how to make your own to all of my own posts that mention it.
I appreciate this is an older thread, but you can now order Freezer Paper from Amazon.co.uk or buy it in larger HobbyCraft stores in England.
Good to know. Thanks Laura!
This is lovely! I’ve long wanted to embroider one of Joel’s drawings. Thanks!
This spot was very inspiring.
Thanks everyone. And THANKS Wendi!
I’m totally excited about post too. Wendi is awesome at explaining all of this! I only knew how to backstitch before, so I can’t wait to try some lazy daisies. Cool!
Hi, Joel!
I’m visiting from Wendi’s, Shiny Happy World. It’s wonderful to see a dad get involved with the kids like you do. Sometimes I get invited to play in the kids worlds too, and happen to think it’s one of the best places to be :-)
One of my favorite embroidery projects is to have a child, after they learn how to print their names, draw a picture of themselves (they usually make stick figures at this stage) and to print their name at the bottom of the picture. From that I blow it up to the frame size I might have, and embroider their picture for them. Having the patience to teach them to embroider it themselves would make the memory even better. It’s also a great hanging for their room.
Thanks everyone for all the kind comment. And thank YOU Joel for inviting me to be a guest on your blog!
A couple of you mentioned stitching with kids and I wanted to throw in a couple of comments on that. If they’re very young and they’re not ready for a sharp needle yet, try using burlap as your fabric and a large-eyed blunt needle with some yarn for your thread. Dip the end of the yarn in some Fray-Check or clear nail-polish and let it dry. That will make threading (and re-threading) the needle easier for even the littlest hands. And they’ll love being able to thread it successfully themselves! Resist the urge to tie the thread on to the needle. I’ve been seeing that more and more often and it make it really difficult to fix mistakes. After they pull the needle right off the thread a couple of times, even very young stitchers will learn to pull while hanging on to the needle AND thread.
The most common mistake I see kids make is wrapping the thread around the edge of the hoop – stitching front to back and then around to the front again instead of coming up for the next stitch from back to front. Teach them to say aloud what they’re doing while they’re doing it, “front to back; back to front; front to back; back to front. . .” It will help them stay focused on that aspect. Running stitch is the best for kids to start with. Backstitch can be conceptually tricky until they get the hang of things.
Have fun!
Great post!
In Holland it is also difficult to find freezer paper. I use something else instead: the paper that is used to pack printer / xerox paper. It has a wax on the inside of it. You just simply iron it onto the shirt.
[…] enough on the day we started this sewing up popped this post on the Made by Joel blog (a fascinating place with masses of ideas for art and craft with children, […]
i love this! am going to try making something similar. further to the freezer paper in the uk… i’ve noticed that hobbycraft sells it but it is pretty expensive… so i haven’t invested in it yet!
I’m so glad I finally read this post! I loved your tutorials and am so excited to embroider! I usually hire-out anything I want done to my mom :)
[…] MadeByJoel.Com a great place to find printouts and other crafty paper toys for your kids but this tutorial by guest Wendi Gratz is brilliant for a fun embroidery pattern. I’m seeing this on a pillow […]
[…] 6) Embroidery pictures on madebyjoel […]
[…] again everyone! Way back in July I posted here about some basic info you need to start embroidering – and I shared some of the details about […]
[…] The fun thing about embroidery is that YOU get to decide what colors you use, what stitches you use, how thick your lines are, etc. But a lot of people always want to know how to duplicate exactly what I have on the cover of my patterns, so I thought I’d provide a stitching guide to MY version of Joel’s Paper City, as well as give you some insight into why I made the decisions I did. I love the black and white line drawings that Joel does, and I didn’t want to mess with that quality too much – so I kept most of my lines nearly black (I use DMC #3371 for almost all outlining. Guest Post | Embroidery How-To For Beginners Of All Ages | Made by Joel […]
I am trying to find someone to do some embroidery work for me that wont cost a fortune, I needa letter put on a graduation hat with her stars for lettering more than once, alongwith a piece of cloth wiht the drama face on it with her name school and years she was in it. I also nee soemone to put a letter on a lettermans jacket with the same info. How much would that cost me? If you do this or you know of someone letme know. I am a signal mom so I want to do this for my kids in drama and who are out for their christmas. Can you please get back to me as soon as you can with a price. Thanks Susan Cell 757-228-2758 or work 8-4 757-464-3144 ext 2
This is lovely! I’ve long wanted to embroider one of Joel’s drawings. Thanks!
[…] the Internet. For anyone who wants to teach themselves to embroider, you can start where I did with this webpage, written by Wendi Gratz of Shiny Happy World, where I found even more information about embroidery. […]
[…] Embroidery for beginners, a guest post by Wendi Gratz, over at the fabulous Made By Joel. Contains some really great tips for different stitches to use to get the results you want. […]
[…] new to embroidery and want to give it a try, check out the guest post tutorial by Wendi Gratz: Embroidery How-To For Beginners Of All Ages | Made by Joel)Related posts:Kids Beginner Embroidery Pillow ProjectGuest Post | Embroidered Holiday Gift Bags […]
[…] In the guest post I had over at Made by Joel last week, I talked some about how I choose colors and stitches. Scarlett (over at Craft Gossip) wondered if […]
[…] everyone! I’ve got a guest post over at Made by Joel – one of my very favorite […]
[…] some embroidery advice hop over to embroidery queen Wendy Gratz’ guest post over at Made By Joel’s […]
[…] you’ve never done embroidery before, here is a simple tutorial. It’s fast and […]
I don’t know how I have never seen your blog before but I love your stuff! Thanks for sharing so many coloring pages and activities. I am totally going to try this embroidery project.
Just in time for back to school! Thank you.
Thanks for the tip. We want to get back into embroidery!